 Frete Grátis em todos os produtos
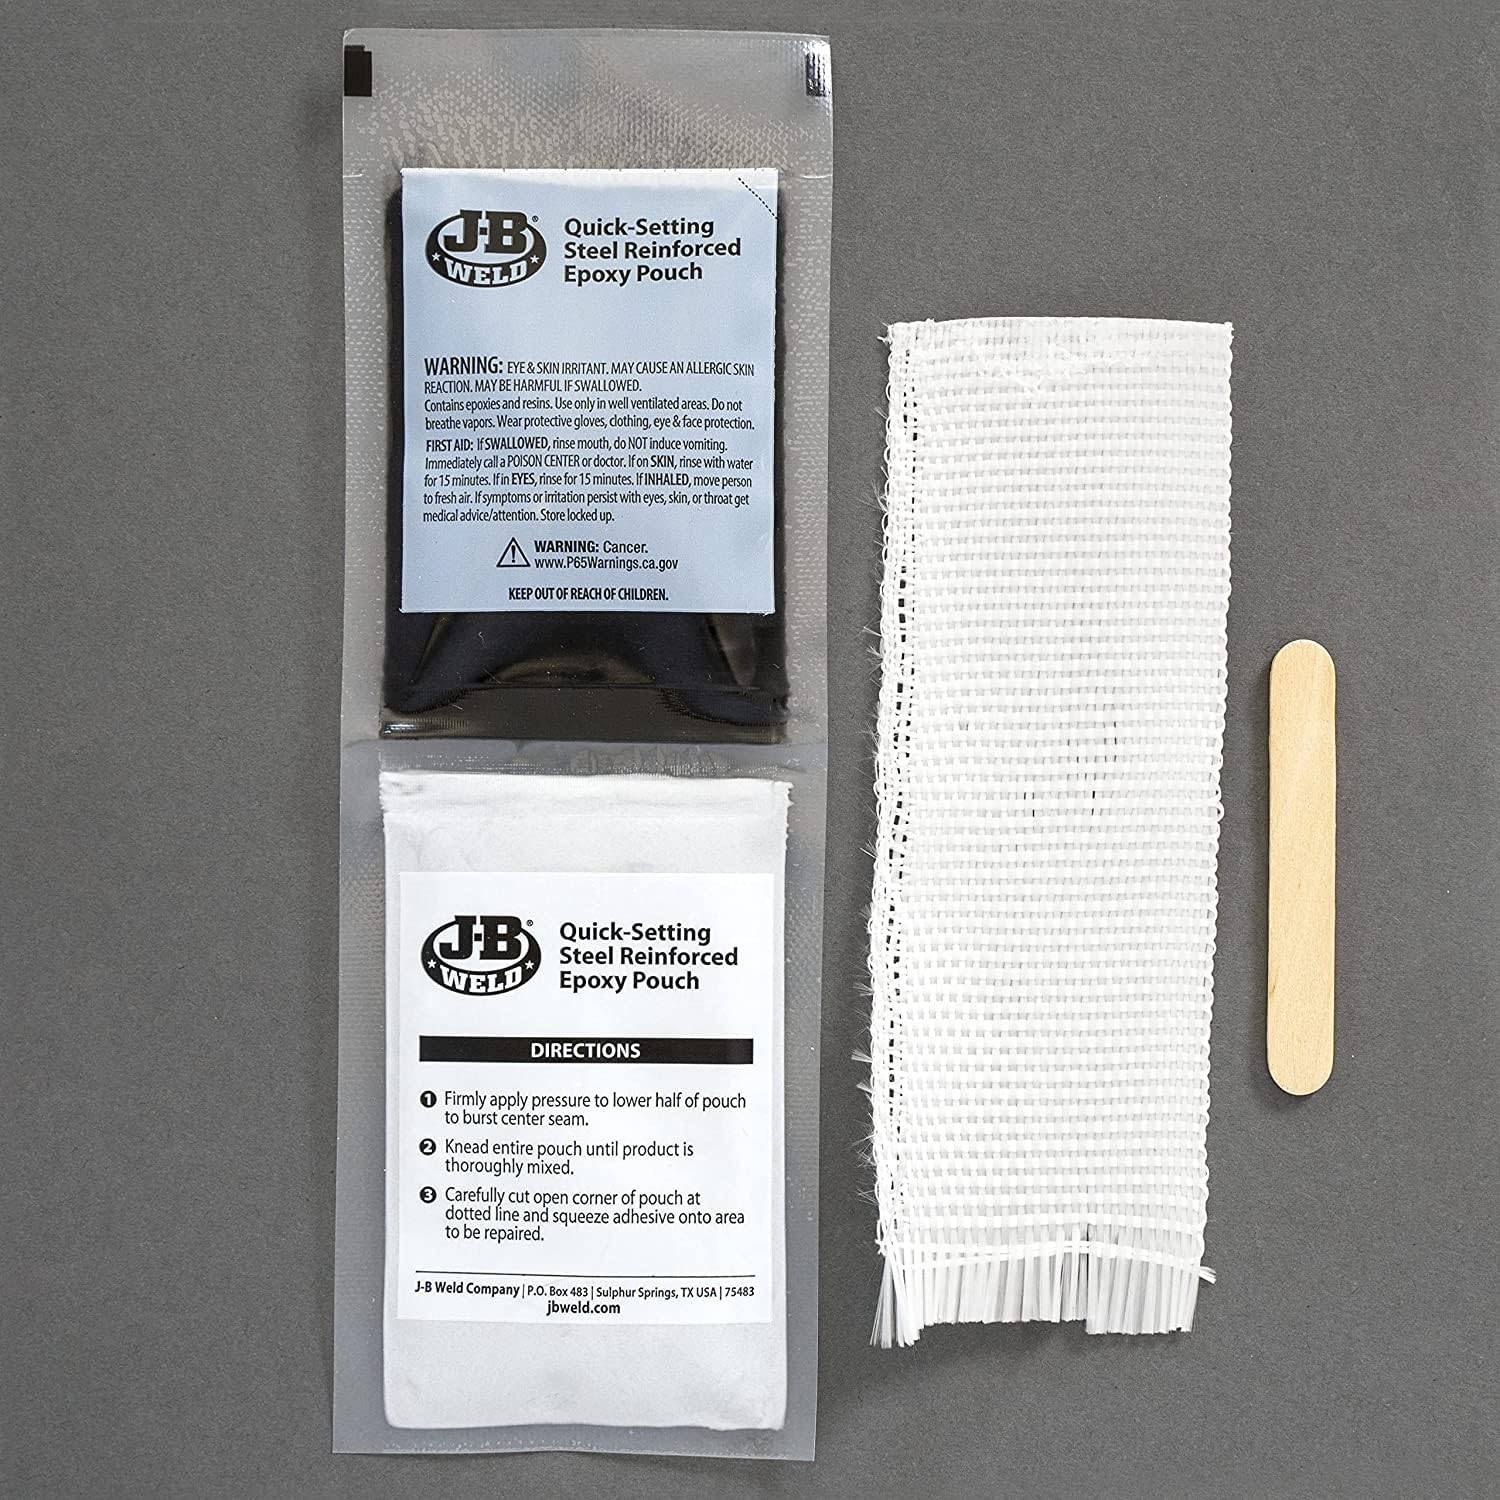


### Descrição do Produto: J-B Weld 2120 Radiator Repair Kit
O J-B Weld 2120 Radiator Repair Kit é a solução definitiva para quem busca reparos de alta qualidade e durabilidade em radiadores e tanques plásticos. Com mais de 40 anos de experiência, a J-B Weld se consolidou como uma marca confiável, oferecendo produtos que garantem a mais forte ligação para seus projetos. Este kit é projetado para facilitar a vida de profissionais e entusiastas do “faça você mesmo”, permitindo reparos permanentes sem a necessidade de remover o tanque ou o radiador.
O RADIATORWELD é um componente essencial deste kit, que inclui tudo o que você precisa para realizar reparos de forma simples e eficaz. Com instruções fáceis de seguir, você pode consertar furos de até 3/8″ de diâmetro ou rachaduras de até 4″ de comprimento. O kit vem completo com massa epóxi, tecido de fibra de vidro, lixa e aplicador, garantindo que você tenha todos os materiais necessários para um reparo profissional.
A versatilidade do J-B Weld 2120 é um dos seus maiores diferenciais. Ele é ideal para radiadores, tanques de fluido de lavagem, tanques de armazenamento, tanques de água, plásticos, compósitos, PVC e muito mais. Profissionais, mecânicos e aficionados por DIY sabem que a J-B Weld é sinônimo de eficiência e confiabilidade.
Não importa o tamanho do seu projeto, o J-B Weld 2120 Radiator Repair Kit é a escolha certa para garantir que o trabalho seja feito corretamente. Com a lendária performance da World’s Strongest Bond, você pode ter certeza de que seus reparos durarão.
### Instruções de Uso:
1. Preparação da Superfície: Limpe a área ao redor do vazamento com lixa para garantir uma boa aderência.
2. Mistura da Epóxi: Misture a massa epóxi conforme as instruções do fabricante até obter uma consistência homogênea.
3. Aplicação: Aplique a epóxi diretamente sobre o vazamento ou rachadura, utilizando o aplicador fornecido.
4. Reforço: Para rachaduras maiores, coloque o tecido de fibra de vidro sobre a epóxi ainda úmida e aplique mais epóxi por cima.
5. Cura: Deixe curar conforme as instruções, geralmente por 24 horas, antes de expor a área reparada à pressão ou líquido.
### Características do Produto:
– Tipo de Produto: Kit de Reparação de Radiador e Tanque Plástico
– Componentes Incluídos: Massa epóxi, tecido de fibra de vidro, lixa, aplicador
– Capacidade de Reparação: Furos de até 3/8″ e rachaduras de até 4″
– Tempo de Cura: Aproximadamente 24 horas
– Versatilidade: Adequado para diversos materiais, incluindo plásticos, compósitos e PVC
– Fácil Aplicação: Não requer remoção do tanque ou radiador
### Perguntas Frequentes (FAQ):
Pergunta: O J-B Weld 2120 pode ser usado em qualquer tipo de plástico?
Resposta: Sim, o J-B Weld 2120 é compatível com uma ampla variedade de plásticos, compósitos e PVC.
Pergunta: Quanto tempo leva para o reparo curar completamente?
Resposta: O tempo de cura é geralmente de 24 horas, mas pode variar dependendo das condições ambientais.
Pergunta: Posso usar o kit em um radiador que está sob pressão?
Resposta: É recomendado que o radiador esteja frio e sem pressão durante a aplicação do reparo.
Pergunta: O reparo é resistente a temperaturas altas?
Resposta: Sim, o J-B Weld 2120 é projetado para suportar altas temperaturas, tornando-o ideal para aplicações em radiadores.
Pergunta: É necessário lixar a área antes da aplicação?
Resposta: Sim, lixar a área ao redor do vazamento ajuda a garantir uma melhor aderência da epóxi.


Mark –
I purchased this to make temporary repairs to my mother’s 2000 Chevy Tracker, the top 2-3 inches of the radiator is plastic, and somewhere along her way it developed a crack that was about an inch long and I wanted something that would hold so she could get around town if she needed to til I could get her new radiator delivered. This failed miserably, I was less than impressed when I opened the package and noticed that their patch material was about 60% unraveled in the box so more than half of the patch was just a ball of string, I decided to try it anyway as there was just enough of the patch left in one piece to actually cover the crack so I roughed up the area around the crack with a heavy grit sandpaper applied a layer of the JB Weld then worked the patch into said layer covering the crack, then laid another layer over that just enough to cover the patch material and let the car sit. the car wasn’t driven for several days before this and I purposely let it sit for 3 days after applying the patch, started the car a few days later and the patch failed across the top I’d guess/estimate about 30-40% of the patch material didn’t even adhere to the radiator plastic and when the coolant heated up it just peeled back and let water out anyway.
TLDR: Don’t waste your time or money on this product as it doesn’t adhere and will just leak regardless.
Mark –
It worked for me. I had a 3 inch long crack in the black plastic top tank of my radiator on my 2006 Subaru Impreza. It was spewing out coolant after I would drive and creating smoke coming from under the hood I think from the coolant hitting other hot engine components and burning. First I let the car sit overnight to make sure it was completely cooled down and there was no pressure in the system. Then I cleaned the area with a wet paper towel and dried it with a dry paper towel. Then I hand sanded it with a small piece of 100 grit sandpaper until the surface looked rough. Then I blew off the dust and cleaned it again with paper towels and made sure it was dry. Then I cut my fiberglass mesh down to size. I only used about 2/3 of the length and 2/3 of the width of the fiberglass mesh. Then I got a piece of corrugated cardboard about 6 inches by 6 inches. Then I put on rubber gloves and cut the corners off both of the epoxy pouches and dispensed approximately half of the black epoxy and half of the white epoxy into two separate blobs on the cardboard. Then I mixed it very quickly with the popsicle stick until it was a uniform gray color and then quickly applied a layer to the crack and all around it a little bigger than the fiberglass piece. Then I applied the fiberglass mesh lightly pushing it into the epoxy. Then I put the final layer of epoxy on quickly covering the fiberglass mesh completely. I still have half of the epoxy left unused in the bags. I checked it after about 5 minutes and it had set and was hard. After 4 hours it was still tacky but by about 6 hours it didn’t seem tacky anymore. Just to be safe I waited until the next day to drive the car. The epoxy seems as hard as the plastic radiator. So far no leaks at all everything is nice and dry all around there. I have been driving the car around daily like normal. Initially I wasn’t sure if this would work but I was happily surprised that it did. Will try to update this if it ends up leaking in the future. Definitely was worth it for me because the car is getting old and has other problems so I didn’t want to put too much money into it. Hope it works well for you too.
Mr Darren B Smith –
used to patch crack in plastic radiator, lasted 6 days……only had about 60 seconds before epoxy starts to harden, wasted half of contents , because it started to set so fast, also too expensive for what you get
Leonard J Moore –
I hit a turkey, and it cracked the top of my radiator!!!
I cant notice the crack by eye, nor can I feel it with a fingernail.. But it does lose and spurts out coolant..
I’ on a fixed income and can’t afford a new radiator right now..
We are going on a trip next week, so I have my fingers crossed!!
Fist off, I went through the process, laid down the fiberglass cloth and it looks nice!! And not one leak or spot of dampness!!
First, carefully cut the 2 bags apart from each other, but do not cut them open!!!
Sand sand sand, do a nice job… Clean it and the surrounding area really good… Alcohol, etc.. I used windex.. Cleaned it, dried if..
Then cut and shape your fiberglass cloth to size..
You want plenty of overlap over the crack or hole..
This is getting things ready..
Knead the black bag, unopened.. Mine was quite hard, but loosened up after kneading..
Cut the corners of each bag, about a quarter inch..
Here’s the trick!!! Squeeze out just enough to do the job!! And do not squeeze them out on top of each other or let the black pile touch the clear pile…
Once they touch, it starts the curing process..
They call for 50-50 of each, black and clear..
I used less clear in the mix.. The clear makes it harden faster.. Know where you’re gonna put it before all this and get the right tool to mix and the right tool to spread or apply it.
I used an old ins card to smooth and spread and a popsicle stick, to mix the two, together!!
Mix the amount you need, and apply, spread it..
Put it in the cracks or holes and spread it fairly smooth..
While still wet and tacky, put the cloth on and quickly press the cloth into the mixture.. Smooth it out with whatever tool your using.
Now, the cloth and jb weld should be pretty tacky..
Mix up the rest of the batch, in equal parts and spread it on top of the cloth, and be sure to overlap the cloth and area… Keep working on it neatly till its too stiff to work with.. Less than a min..
I let my repair sit over night, with the radiator cap off and the coolant, below the repair area..
Checked today, and it was hard as a rock..
Topped off the coolant, ran the car in idle, dry as a bone.. Then took it for a ride!!! Perfect so far…
Moral of the story, watch out for turkeys!!
Plan your repair.. Get your mixer, spreaders, cloth cut to size etc… And prepping of the surface..
JB weld always performs the best, but its up to you, to take your time prepping, follow directions, and have everything you need ready, BEFORE you cut those bags open… The brush that comes with the kit, use it with your last coat… To spread and smooth.. If you use it first it will be junk in 30 seconds.. I will let everyone know how it all holds up.. New post and update.. It has been about 2 weeks now.. No leaks.. None
And this was including a 600 mile + trip… It included, high speed, 80+ to hills to traffic jams…! Not a leak or drop.. In the amount of time since using JB, I probably have put about 1000 on, and it works perfectly…
Aug.12, 2023. Update.. Many more miles added and no leak, not a drop!!
جواد ا. –
I used this product on my rad in a 2009 Jeep wrangler. I did not mix the whole package at once as then you won’t have enough time to work with it. I sanded the area of the rad first then put a coat of the Jb repair. Then added the fiber glass to the first coat before it dried. This product dries/cures really quickly. I then added a few more coats around the fiber glass to seal it up. It’s been a mth already with no signs of leaking and we are heading into a really cold week so see how it holds up now. I’m happy with this product and would buy again.
Alastaire –
Fantastic. This worked really well and hasn’t leaked after 2 months driving. Quick fix and long lasting solution.
don –
المنتج سيئ وأنصح بعدم شرائه جربته لشعر بسيط في الرديتر وللأسف مازال التسريب بالرغم أن الإنشعار (الكرك) بسيط جدا
GL –
It worked for my BMW E83.
I had a pin hole on the aluminum radiator at fan side, on fluid tube between micro zig zac fins.
I put half of this J-B glue on in a rush, hoping it would work. but it didn’t.
I checked myself for the reason why it didn’t work, and concluded that 1. didn’t make the area dry -at the time when I put the glue on there was wet fluid running, 2. didn’t mix the glue thoroughly -I was afraid that I would have no time to put the glue on before it hardens as read of the comments by others.
Before the 2nd time, remove the zig zac micro fins around the tube, made sure that no fluid running toward outside, then put just a little RTV SupperBlack first to seal the pin hold, wait for it cured, them take good time to mix the glue crazily -no worry about that it would harden in one minute, no it won’t, at least in about 10 minute it won’t. Put the well mixed glue on the area around, first layer then fiber, then then another layer then wait over night. The next morning it became hard and shine with nice color. More important, no leaking.
As I like it, I bought another pack keeping it for spare.