 Frete Grátis em todos os produtos


### Descrição do Produto
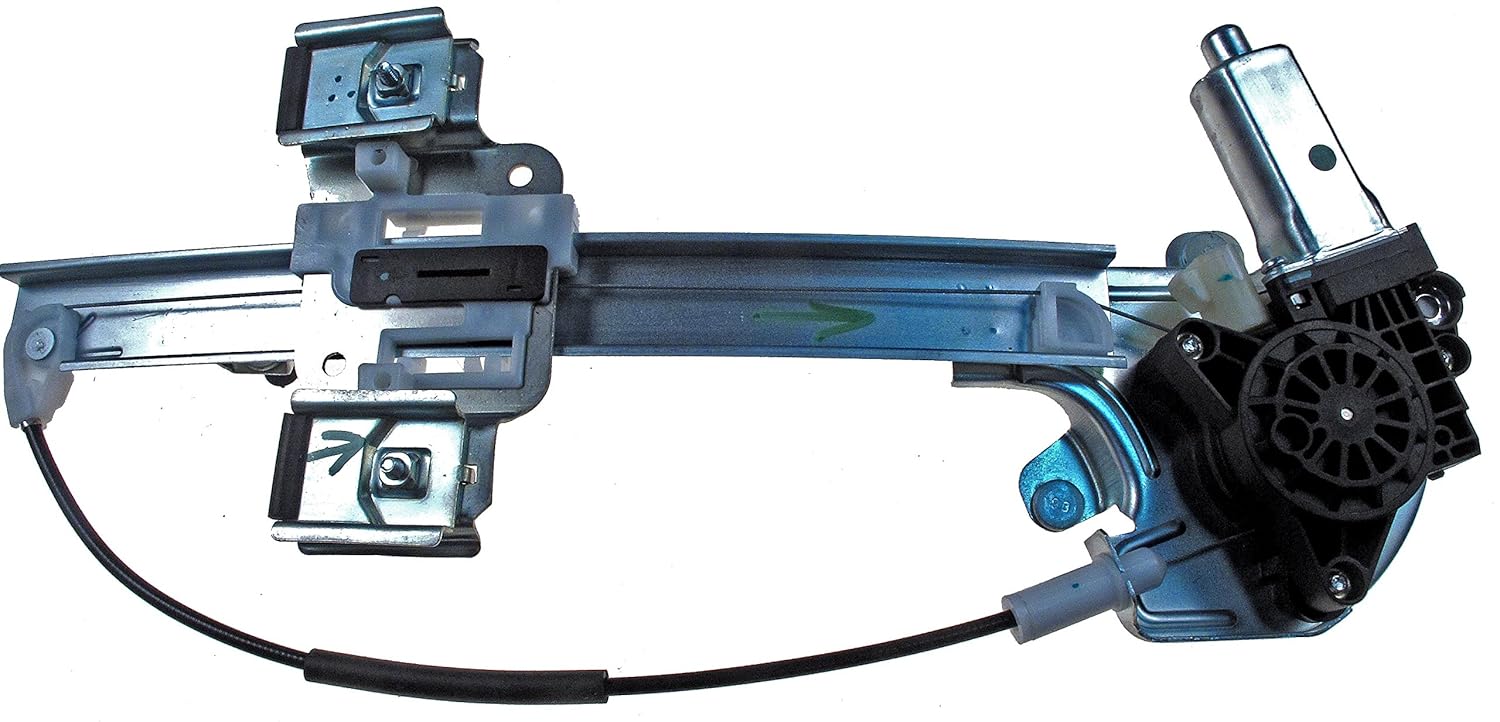
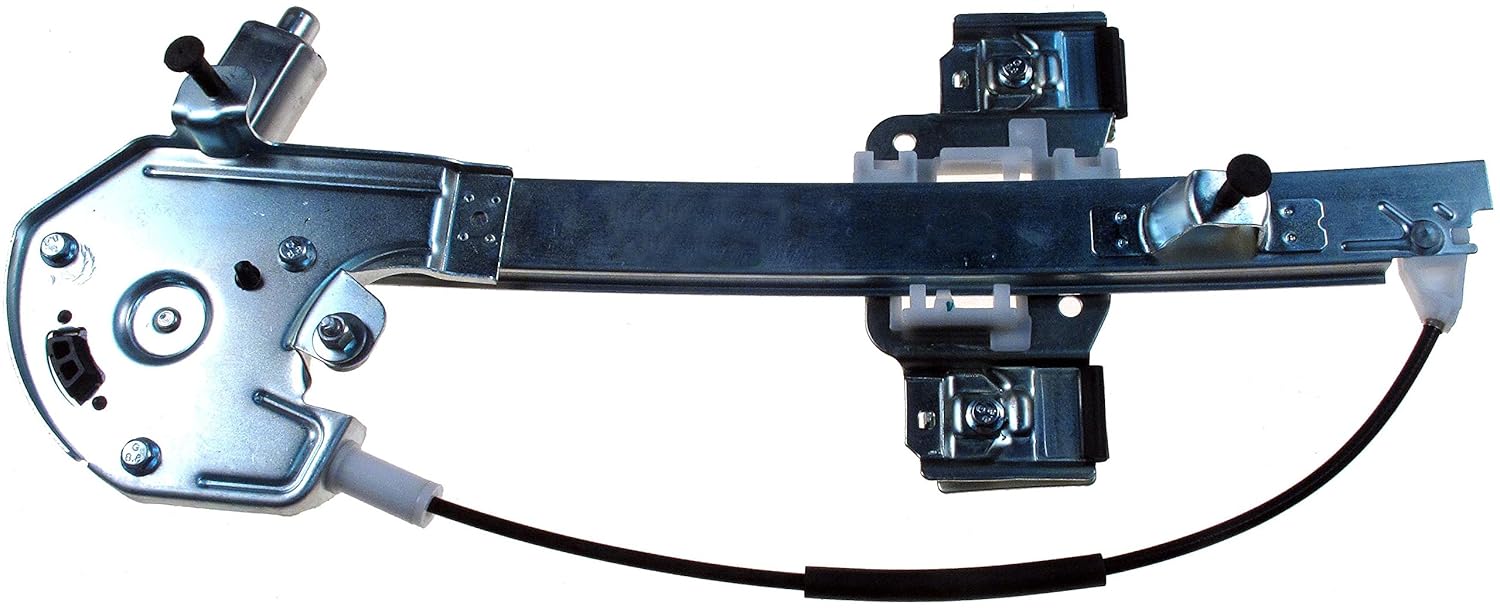
O Dorman 741-811 é um regulador de janela elétrico traseiro do lado do motorista, projetado especificamente para modelos selecionados da Buick. Este produto é a solução ideal para quem busca um substituto confiável e de alta qualidade para o regulador de janela original. Com engenharia e testes rigorosos, o Dorman 741-811 foi desenvolvido para corresponder perfeitamente ao ajuste, função e desempenho do regulador de janela original, garantindo que você tenha uma experiência de uso sem interrupções.
A qualidade é uma prioridade, e o Dorman 741-811 foi extensivamente testado, passando por milhares de ciclos em uma porta de veículo real. Isso assegura uma vida útil longa e sem problemas, permitindo que você desfrute de um funcionamento suave e eficiente da janela do seu carro. A instalação é facilitada pelo design que foi reengenheirado para corresponder à forma e dimensões do equipamento original, proporcionando um encaixe direto e sem complicações.
Com um design confiável, o Dorman 741-811 é projetado na América do Norte e é respaldado por uma longa história de experiência no mercado de reposição automotiva. Para garantir que este componente se encaixe perfeitamente no seu veículo, basta inserir a marca, modelo e nível de acabamento no Amazon Garage, assegurando que você está adquirindo a peça correta para suas necessidades.
### Instruções de Uso:
Para instalar o regulador de janela Dorman 741-811, siga estas etapas:
1. Desconecte a Bateria: Antes de iniciar a instalação, desconecte a bateria do veículo para evitar qualquer risco elétrico.
2. Remova o Painel da Porta: Utilize uma chave de fenda para remover os parafusos e clipes que seguram o painel da porta. Tenha cuidado para não danificar os clipes.
3. Desconecte o Regulador Antigo: Desconecte os fios do regulador de janela antigo e remova-o da porta.
4. Instale o Novo Regulador: Coloque o Dorman 741-811 na posição correta e conecte os fios conforme necessário.
5. Recoloque o Painel da Porta: Após a instalação, recoloque o painel da porta e fixe-o com os parafusos e clipes.
6. Reconecte a Bateria: Por fim, reconecte a bateria e teste o funcionamento da janela.
### Características do Produto
– Substituição Confiável: Projetado para corresponder ao regulador de janela original em veículos selecionados da Buick.
– Qualidade Garantida: Testado em condições reais para garantir um desempenho duradouro.
– Instalação Simples: Design que facilita a instalação, com encaixe direto e sem necessidade de modificações.
– Design Confiável: Desenvolvido na América do Norte, com suporte de uma marca respeitada no mercado automotivo.
– Compatibilidade: Verifique a compatibilidade com seu veículo usando o Amazon Garage.
### Perguntas Frequentes (FAQ)
Pergunta: O Dorman 741-811 é compatível com meu modelo de Buick?
Resposta: Para garantir a compatibilidade, insira a marca, modelo e nível de acabamento do seu veículo no Amazon Garage.
Pergunta: É difícil instalar o regulador de janela Dorman 741-811?
Resposta: Não, a instalação é simples e pode ser realizada com ferramentas básicas. Siga as instruções de uso para um processo tranquilo.
Pergunta: O que fazer se a janela não funcionar após a instalação?
Resposta: Verifique se todos os fios estão conectados corretamente e se a bateria está reconectada. Se o problema persistir, consulte um profissional.
Pergunta: Qual é a garantia do produto?
Resposta: O Dorman 741-811 é respaldado por uma garantia que cobre defeitos de fabricação. Consulte o vendedor para mais detalhes.
Pergunta: O regulador de janela Dorman 741-811 é durável?
Resposta: Sim, ele foi testado para garantir uma longa vida útil e um desempenho confiável, mesmo após milhares de ciclos de uso.


Allen –
I had to install two of these in a Buick, and found them to perform better than original equipment on the car, and much less expensive than original equip replacements.
Trebor Onamor –
I used a Youtube video (length 11min 15sec, titled 2002 Buick LeSabre…) to guide me through the install. For $60 this is better than the NAPA or Advanced Auto Parts prices I found. They charged about $100-$120 for the same item. I am not someone who is naturally skilled at this type of work, but I’m also not exactly a hopeless nerd who can’t do anything right. With the Youtube video I was able to remove the door, access the regulator and motor, remove them, install the new part, and put the door back together in approximately 1 hour. I used the 1-day rush delivery for an additional $7 but it was worth it because I have a baby who can’t be stuck by an open window for December holiday shopping in the Northeast.
For the install you need a putty knife with a decent blade that won’t bend too easily, a 10mm socket with socket wrench and extension, and a philips and a flat head screwdriver – all relatively common tools that most people can buy cheap or find very easily by asking a friend or neighbor. I would guess that most adults could do this repair in an afternoon.
John Kimberley –
works fine.
KC –
First one worked for a little over a year. They were great on the warranty and sent me a new one quickly
Amazon Customer –
The unit fit perfectly and works great. This is the second window operating system I have bought (different windows).
E. Sell –
this is the 2nd one I have had to buy ,so both back doors have broke
these are a great replacement unit ,fit right in on problem easy to install
and complete
Amazon Customer –
Fit perfectly in 2002 Buick Lesabre. I had to remove the styrofoam block that is held on by 2 plastic retainers to make room for the removal and installation of the regulator. Its easy to break the styrofoam mounting ears when trying to remove it. Just to be sure I didnt break the ears I cut the head of the plastic retainers off carefully and devised a replacement fastening method since I didnt have the identical replacement retainers . Would have been nice to include those retainers with the regulator. The regulator did include 6 new door panel clip assemblies should you need them. I didnt break any when door panel was removed so I didnt need them.
Dennis –
Once mounted in place, I found that the new Dorman regulator arm upon which the traveling “clamp” that holds onto the lower edge of the window pane and moves it up and down was too short. The carriage was all the way up; it couldn’t go up any further. What this means is that once you’ve removed the old window regulator and manually lifted the window glass all the way up and taped it in place, the two bolts in the new regulator that are used to tighten the clamps onto the glass do not appear in the two access holes in the door frame. Instead, they were about 3/4″ to 1″ below the access holes. Using a socket wrench to tighten them with the window properly aligned and taped up into position was out of the question. Using a Philips head screwdriver was also impossible. Using a nut driver was impossible. I had to resort to using a small combination wrench and reaching around through the seemingly razor-sharp openings in the door frame sheet metal. I struggled for over 40 minutes trying to fit a wrench onto them and tighten them using a 10mm combination wrench. I finally got the right hand bolt pretty tight after enduring a couple of minor cuts to my fingers and knuckles. I could barely get the wrench on the one bolt on the left side, certainly not well enough to actually rotate and tighten it. There just isn’t a proper angle to reach the that one and get a grip on the bolt head. So I took a risk, connected power and lowered the window part way. Then I could easily reach and tighten the left bolt. Even then, the clamps only gripped the glass by their tips. Much to my chagrin, the window wouldn’t go all the way up because it was no longer properly aligned in the door frame/window channels. It took several readjustments with window half-way down to get it aligned so that it would go all the way up.
This was probably the third requlator I’ve installed in this car. It’s not like I was inexperienced at this. That said, anyone that says they can install a window regulator from start to finish in a car like this is not being honest. Even without the faulty design/fit issue, it would take at least an hour or more likely two hours to do this repair. For example, using purpose-built auto upholstery tools for removing the carpeted panel could not be used to pry the panel off far enough to grip it with your fingers and manually pull it loose. Using a putty knife for this purpose is out of the question. I had to go next door and borrow a 24″ iron crowbar to get enough leverage to pop it loose far enough to pull the rest of it free. Removing the Styrofoam blocks without damaging them was another problem; the two plastic pins holding them in place would not come out. Unplugging the motor power cable wasn’t a piece of cake, even though I’ve encountered connectors like that before. There just isn’t a whole lot of room to get to it. I cannot recommend this window regulator due to the poor fit for this car.
Jonathan Matthies –
Fits up well.
D. T. Johnson –
I have now installed 3 of these in my 2001 Buick LeSabre, so I know it’s just a matter of time before number 4 goes. This is about a 1 hour job, and does not require any particular skills or tools. A metric socket set and basic mechanical skills will help you get the job done. The door panel comes off by removing one screw behind the handle cover plate and then prying the door panel loose starting at the bottom edge. This particular window regulator comes with a set of the plastic door panel fasteners, so if you break one during removal it is no problem. Once the bottom edge is loose, you slide the top edge of the panel up to get unhooked from the door frame. There will be a couple wire harness connectors to remove once you get the panel loose. Under the panel is a plastic liner sealed with RTV, and this liner must also be removed. When replacing this liner the RTV will mostly stick back in place, but I keep a tube on hand for any areas that get too gunked up to re-stick. You will see a few nuts to remove for the regulator, and also two nuts that release the clamps holding the glass. Get all of these loose and then maneuver the old regulator out (this is the trickiest part). I have found that sliding the window all the way up and holding it in place with Gorilla duct tape makes this job easier.