 Frete Grátis em todos os produtos


### Descrição do Produto
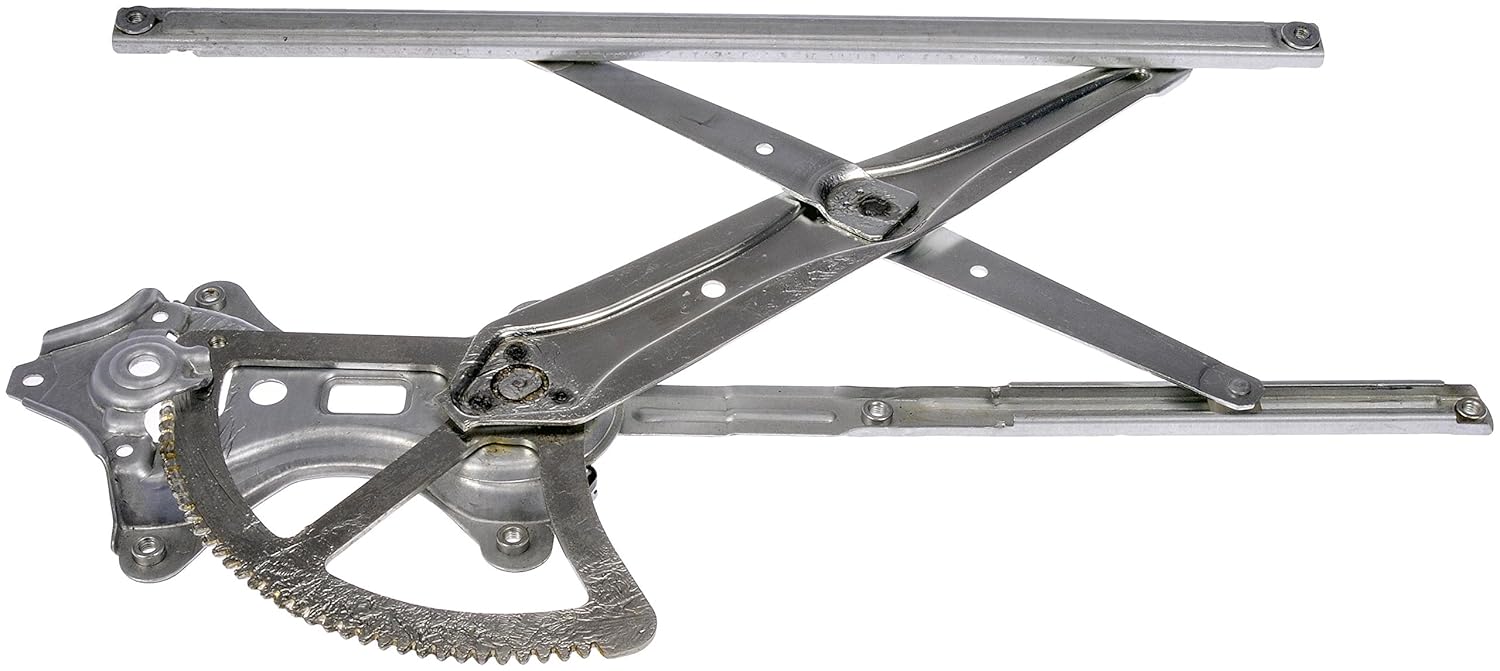
O regulador de janela elétrica Dorman 740-326 para o lado do motorista é a solução ideal para quem busca um substituto confiável e de alta qualidade para o regulador de janela original de modelos selecionados da Lexus. Este produto foi meticulosamente projetado e testado para garantir que se encaixe perfeitamente, funcione de maneira eficiente e ofereça um desempenho equivalente ao do regulador original.
Com um compromisso com a qualidade, o Dorman 740-326 passou por testes rigorosos, incluindo ciclos de operação em portas de veículos reais, garantindo uma vida útil longa e sem problemas. A engenharia deste regulador é realizada nos Estados Unidos, respaldada por uma longa história de experiência no mercado de peças automotivas, o que assegura um design confiável e durável.
A instalação deste regulador é simples e direta, pois foi projetado para corresponder à forma e dimensões do equipamento original, proporcionando um encaixe perfeito e sem complicações. Para garantir que este componente se ajuste ao seu veículo específico, basta inserir a marca, modelo e nível de acabamento no nosso ferramenta de compatibilidade.
### Instruções de Uso:
Para instalar o regulador de janela Dorman 740-326, siga os passos abaixo:
1. Desconecte a Bateria: Antes de iniciar a instalação, desconecte a bateria do veículo para evitar qualquer curto-circuito.
2. Remova o Painel da Porta: Utilize uma chave de fenda para remover os parafusos e clipes que seguram o painel da porta. Tenha cuidado para não danificar os clipes.
3. Desconecte o Regulador Antigo: Desconecte os fios do regulador de janela antigo e remova-o da porta.
4. Instale o Novo Regulador: Coloque o Dorman 740-326 na posição correta e conecte os fios conforme necessário.
5. Recoloque o Painel da Porta: Após a instalação, recoloque o painel da porta e fixe-o com os parafusos e clipes.
6. Reconecte a Bateria: Por fim, reconecte a bateria e teste o funcionamento da janela.
### Características do Produto
– Substituição Confiável: Projetado para corresponder ao ajuste, função e desempenho do regulador original.
– Qualidade Garantida: Testado extensivamente em condições reais para assegurar uma vida útil prolongada.
– Design Confiável: Engenharia americana com uma longa história de experiência no setor automotivo.
– Instalação Fácil: Projetado para um encaixe direto, sem necessidade de modificações.
– Compatibilidade: Verifique a compatibilidade com seu veículo usando a ferramenta de garagem.
### Perguntas Frequentes (FAQ)
Pergunta: O Dorman 740-326 é compatível com meu modelo de Lexus?
Resposta: Para garantir a compatibilidade, insira a marca, modelo e nível de acabamento do seu veículo na ferramenta de compatibilidade disponível.
Pergunta: É difícil instalar o regulador de janela?
Resposta: Não, a instalação é projetada para ser simples e direta, com um encaixe perfeito que não requer modificações.
Pergunta: O que fazer se a janela não funcionar após a instalação?
Resposta: Verifique se todos os fios estão conectados corretamente e se a bateria do veículo está reconectada. Se o problema persistir, consulte um profissional.
Pergunta: Qual é a garantia do produto?
Resposta: O Dorman 740-326 vem com uma garantia que cobre defeitos de fabricação, garantindo sua confiança na qualidade do produto.
Pergunta: O regulador é testado antes de ser vendido?
Resposta: Sim, o regulador passa por testes rigorosos em condições reais para garantir sua durabilidade e desempenho.


Kelly H. –
I just used this part in a 2000 lexus rx300 for the front driver’s side window and it worked perfectly. It does NOT look like the OEM regulator – the stationary top arm of the regulator that bolts to the door is shorter and moves freely in the aftermarket version (I checked multiple brands other than dorman) whereas the OEM stationary arm is longer and attaches to the main body of the regulator right under the black spring. Don’t be alarmed, it’s supposed to be that way and it WILL work. In fact, I think that removing and installing the dorman aftermarket regulator was a lot easier to work with since that top arm was not attached making the regulator less rigid as opposed to the OE design – not sure how this design change will affect it’s performance and long term longevity so we’ll just have to wait and see.
There are a couple of items to remember. First, I’d recommend marking the regulator in a middle position (hatch marks where motor gear teeth meet the teeth of the regulator “gear”. There is a sweet spot for the regulator where you can bolt/unbolt the window from the regulator through the holes of the door with a long 10mm socket. Of course, if your original regulator and motor are stuck like mine were, remove the original as best as you can. Install new motor and regulator (without window attached and I only tightened the stationary arm of the regulator and two of the motor bolts) and position the regulator in the middle. This will help you bolt the window to the regulator as well. At this point, I uninstalled and marked the position of the regulator gear so i could reinstall in same position once I clocked the motor – see below on how to do that. This initial step may not be necessary and just something I did to make sure I have the correct position when you are ready for final installation and window attachment. NOTE: wear gloves and be careful when detaching the window motor from regulator – it is spring loaded and will snap open when you try to remove the motor so be careful your fingers don’t get caught in the regulator.
Secondly, it is critical that you clock the motor BEFORE final installation – just plug in the loose motor prior to installing it to test it for smooth operation and to position it. With the regulator detached and motor plugged in and held securely in your hand (keep your fingers away from the gear as it turns), push window button down until motor comes to a stop. I just pushed the window button all the way down once (to activate auto down feature) and it kept going on it’s own. It may take a little time but it should eventually stop on it’s own, then push UP on window button (gently so as NOT to activate the auto up feature) until the motor gear turns SIX complete rotations – I pushed the window button slowly several times to achieve this. I also marked one of the teeth with a tiny piece of blue painters tape I happened to have on hand – you can use a dab of white out or a marker as well. Once the motor was clocked, I unplugged it and proceded with the full install again. Attach the regulator (match up the hatch marks if you did the initial positioning step as describe above) and install in the door and attach window. Tighten all bolts carefully and do not over tighten, especially the two window attachment bolts. Test window up and down to check for smooth operation. The window should operate flawlessly. The AUTO up/down feature should also work flawlessly. If you use auto up feature and the window rolls up all the way, stops, and rolls back down a third of the way, that means you didn’t click your motor correctly and will need to uninstall and reclock the motor.
If you are not mechanically inclined, I’d recommend letting a mechanic you trust do the work for you. Good luck!
bizzeler78 –
This regulator may be for another Lexus model. It was labelled correctly on the site, packaging, and product appeared to be correct. However, when compared with the OEM regulator, it was slightly different looking. Upon installation, the fit was a little off, but installed successfully. Once we tried to operate the front drivers window though, we found the window only rolls halfway down. This was not due to wrong installation, but the product itself has shorter arms than the OEM piece and allow for less travel. We threw this in the trash and had to go to the Lexus dealership to pick up a genuine Toyota part. I figured the price was too good to be true.
SY –
This product fit my 2000 Lexus RX300 FWD and works. It is exactly the same as my old window regulator that is held with 6 bolts to the door and 2 bolts to the glass.
Ron –
Fits perfectly in my RX300.