 Frete Grátis em todos os produtos
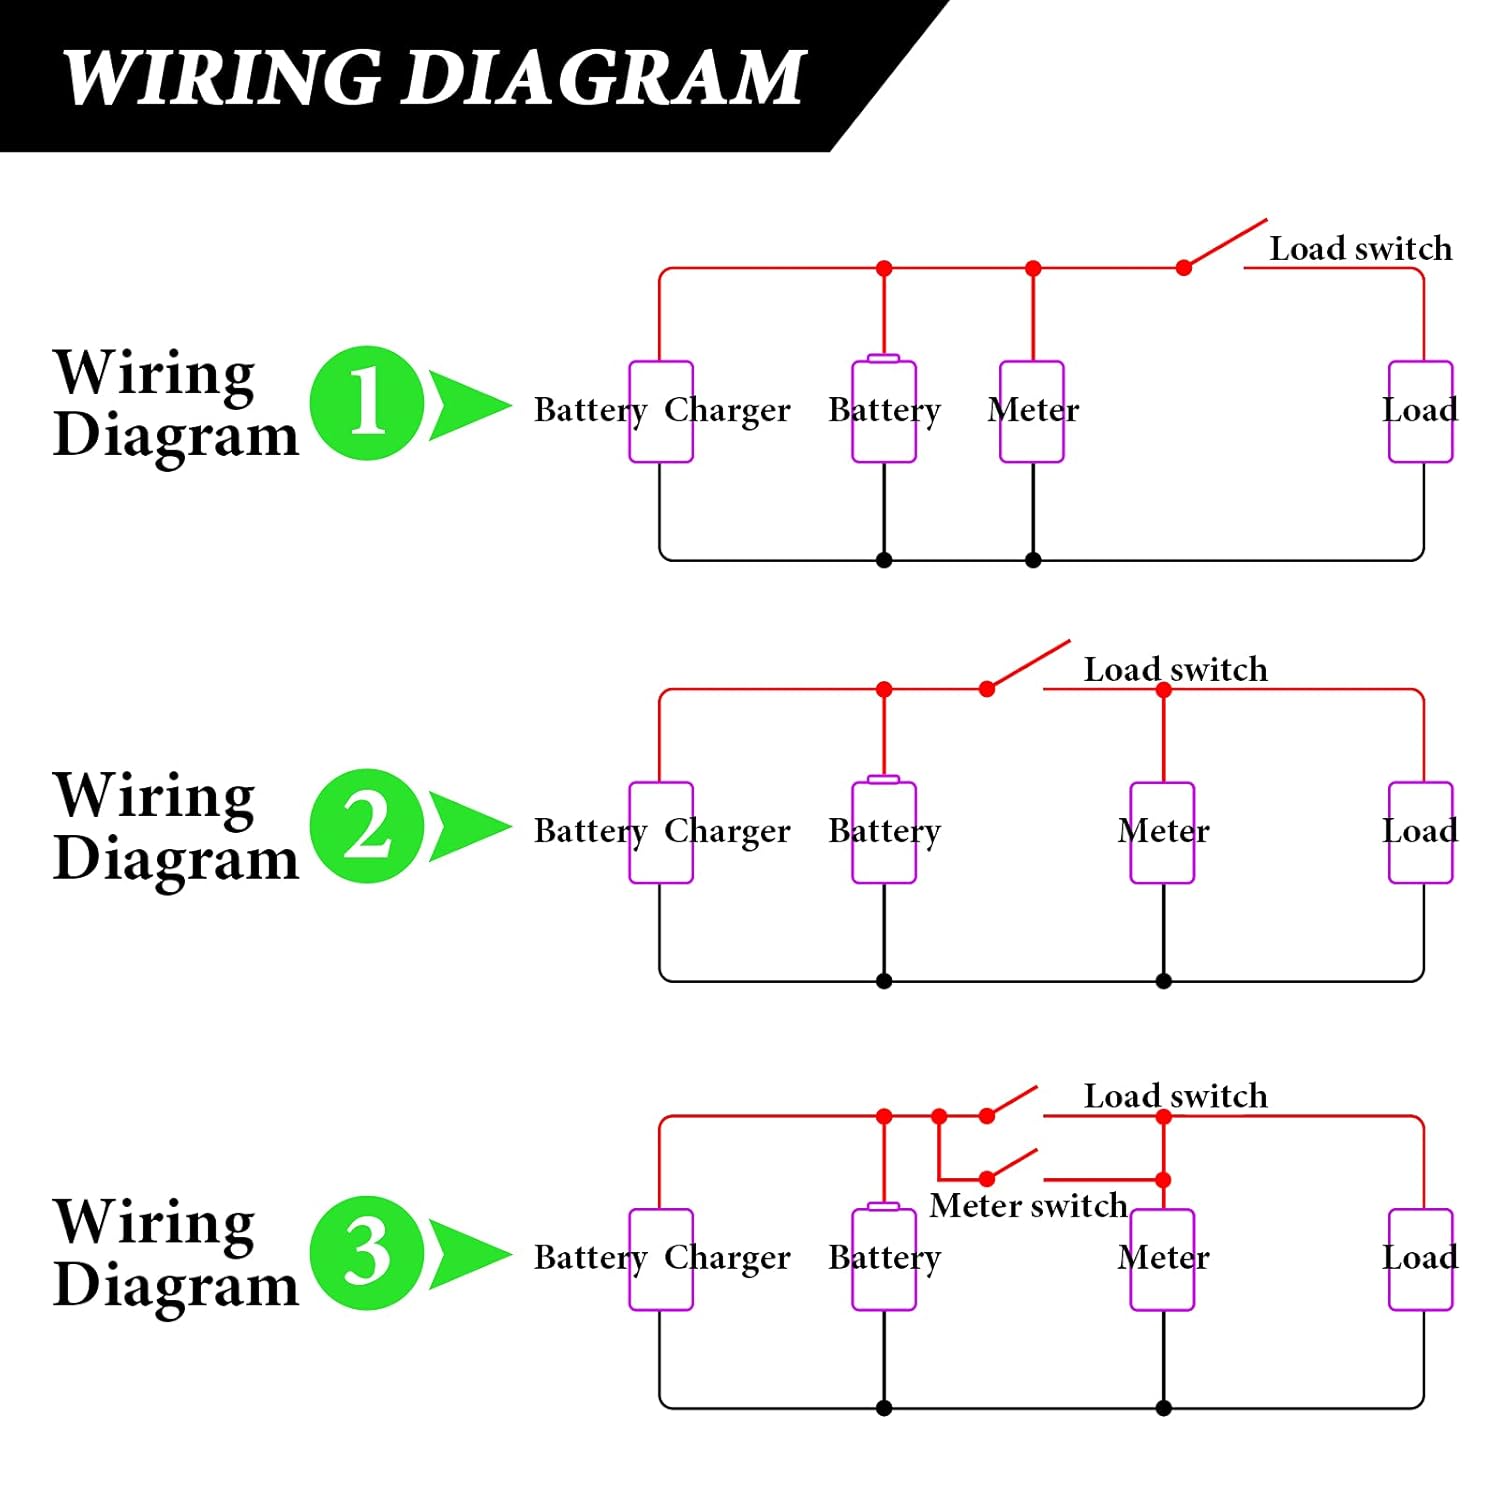
- Efficient setting key: the package includes 1 battery meter; the multifunctional battery indicator has a new design of the front setting button, and have several functions: cycle voltmeter/battery percentage, turn on the backlight, black, sleep mode, battery type selection etc.
- Practical designs: the battery capacity voltage indicators are designed with switched function button, you can press to check the battery capacity or real-time voltage and turn off, with alarm design, the battery meter display will flash when the battery capacity is low
- Fit Different Battery: the battery gauge indicators are compatible with 12V/ 24V/ 36V/ 48V/ 60V/ 72V/ 84V acid battery, ternary lithium battery, polymer lithium ion battery, 3 -15 series lithium ion battery, storage battery, water battery and more, note: if your meter always shows, it means that you have the wrong battery code and need to double-check and the correct code
- Fit different battery: the battery gauge indicators are compatible with 12V/ 24V/ 36V/ 48V/ 60V/ 72V/ 84V acid battery, ternary lithium battery, polymer lithium-ion battery, 3 -15 series lithium ion battery, storage battery, water battery and more
- Where to use: the battery meters with alarms can be applied to different machines and places such as garden, home, office and more, can serve you for a long time, meeting your different needs and practical battery indicators will give you nice experience


 YCUPOEN Car Positive Battery Terminal End 919803X010 Compatible with Accent Azera Elantra Santa Cruz Santa Fe Tucson Carnival EV6 Forte Forte5 Rio Sedona Sorento Soul
*$337.00
YCUPOEN Car Positive Battery Terminal End 919803X010 Compatible with Accent Azera Elantra Santa Cruz Santa Fe Tucson Carnival EV6 Forte Forte5 Rio Sedona Sorento Soul
*$337.00
 Ampper Copper Top Post Battery Terminal Set, Standard Top Post Battery Terminal Clamp Connector Set (+/-) W/Cover and Heat Shrink Tubing for 4 Gauge Wire (1 Pair)
*$301.00
Ampper Copper Top Post Battery Terminal Set, Standard Top Post Battery Terminal Clamp Connector Set (+/-) W/Cover and Heat Shrink Tubing for 4 Gauge Wire (1 Pair)
*$301.00
Frete Grátis em todo o BrasilProduto Original Importado dos EUA
DC 12V 24V 36V 48V 60V 72V 84V Golf Cart Battery Meter with Alarm, Front Setting and Switch Key Battery Capacity Voltage Indicator Gauge Acid and Lithium ion Indicator
*$250.30
Informação adicional
| Brand | Frienda |
|---|---|
| Power Source | Battery Powered |
| Style | Voltage Tester |
| Color | Green |
| Item Weight | 20 Grams |


KitTheBuilder –
Product lacks pretty much all of the functions listed in description. What i received auto detected the type of battery, which is good because the instructions for changing it don’t work. Seems to function fine, but it’s a cheaper version of what it is then what they say.
erin seraydian –
Nice
Paul Hinker –
The voltage display works correctly but the percent of charge does not (at least when used with sealed lead acid batteries). Given the price, having just a volt meter is an acceptable compromise.
Bob Wilkelthorn –
Used them in my truck and RV for keeping track of my auxiliary batteries. Tight readings when tested with multimeter, only a tenth of a volt off on two batteries and dead on on the other two. Definite buy!
Heliodoro –
Pratique, léger et fonctionnel
erin seraydian –
Echoing another review that made my instal crap-simple!
Hopefully this saves you the aggravation I experienced trying to figure it out.
DO NOT MAKE YOUR FINAL INSTALLATION/MOUNT UNTIL YOU KNOW IT IS WORKING.
1) Attach the provided (very short) wire harness to DC power supply (battery) using your own wires and connectors to bridge the space from your battery to the harness.
2) Press and hold the Setting button while plugging the harness into the back of the meter. This gets you into programming mode.
3) By pressing the Setting button, select your battery type. Mine is lead acid so I selected “P”.
4) Select the number of batteries. In the case of Lead Acid they assume you have 12 volt batteries wired in series. In my golf cart I have six 8-volt batteries for a total of 48 volts. When I first programmed it I entered “6” batteries and as a result it read the voltage correctly but the capacity indicated 0%. I later realized they are assuming 12 volt batteries. So 48 volts divided by 12 volts resulted in 4. I entered 4 batteries and it worked. Enter your equivalent number of 12 volt batteries and then long-press the function key. (Note the lithium battery settings assume your batteries are 3.7 V or 3.2V. Your math will be a little different.)
5) Now set how you want the display to act using the s-1 through s-5 settings. The Settings button toggles through the display options and Function sets each one. The five bars on the display from left to right are each associated with the options S1 to S5. Whether a bar is on or off in the display, indicates that setting is on or off.
6) Unplug the meter from the harness to have it save the settings you input.
7) Plug the meter back in. It should be working. If not, repeat the steps starting at number 2.
8) Only after you have it working, mount it in its permanent location.
Good luck!
Kindle Customer –
I have purchased three of these items and they just don’t work it’s like they burn out the Bluetooth says that the battery is at 70%. This thing will say that the battery is at 100%. I think the Bluetooth is right and I know it is because the charger keeps running in the solar panels keep charging even when this says it’s at 100%
Booked with the Bonjours –
This voltage meter is easy to read and super helpful for monitoring battery levels. Works great on my golf cart and other 12V applications.
Heliodoro –
Tres bien
Jacob Nielger –
Saw someone say it doesn’t work with Lifepo4 batteries but if you read the instructions and select battery “F” it works perfectly fine. Instructions are a bit hard to understand at first but once you get it, it makes total sense.
It’s pretty good quality and easy to read. The design could use some help with labeling, but not difficult to figure out two buttons.
I’m very happy with this purchase