 Frete Grátis em todos os produtos


### Descrição do Produto
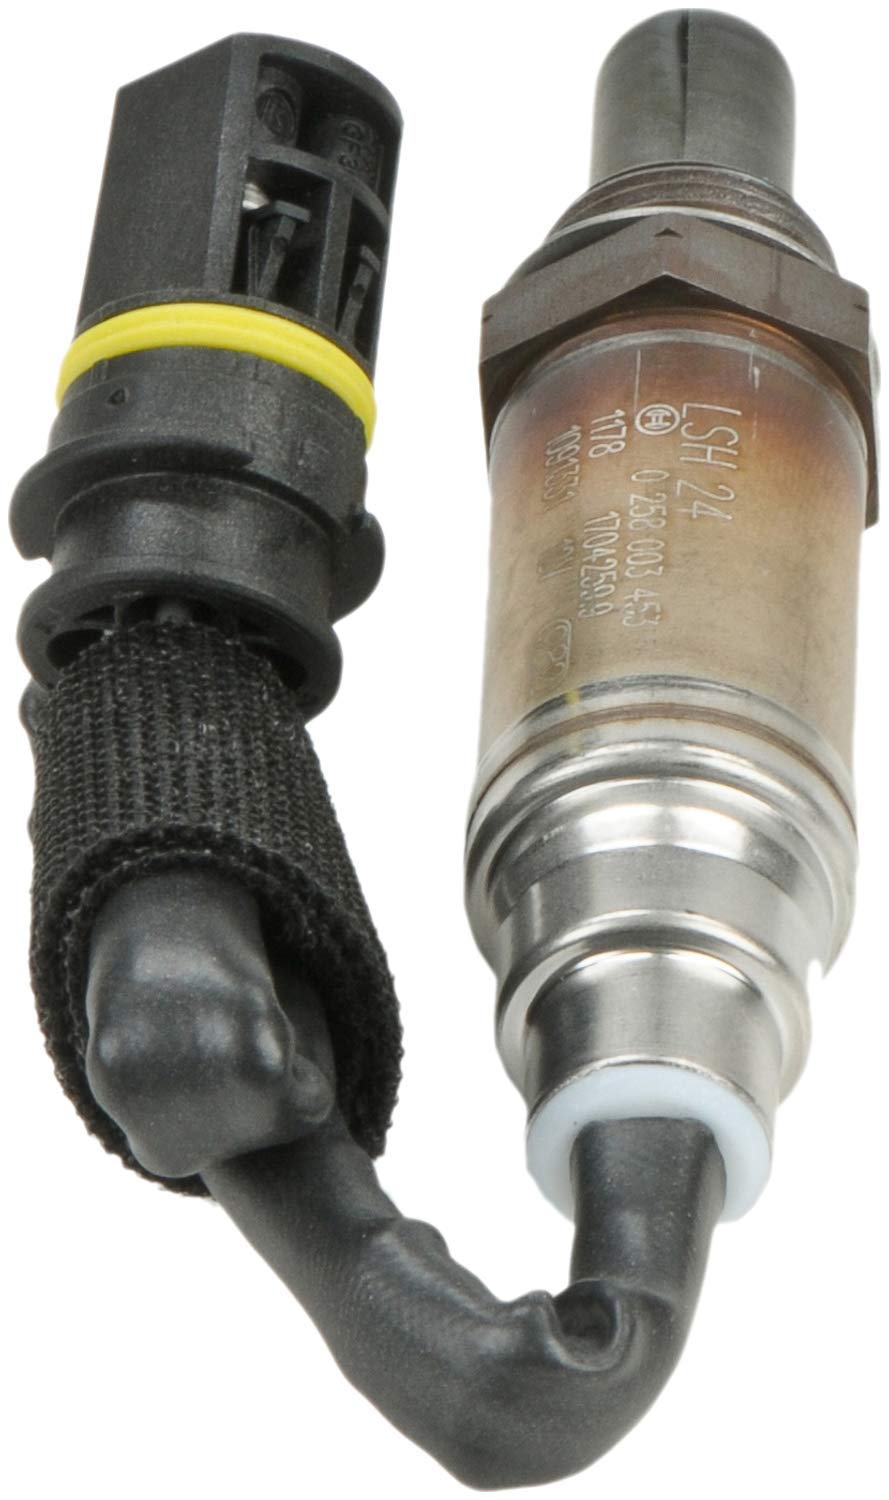
O Sensor de Oxigênio BOSCH 13477 Premium Original Equipment é a escolha definitiva para os proprietários de veículos BMW que buscam não apenas desempenho, mas também confiabilidade e durabilidade. Com uma história que remonta à década de 1960, a Bosch é pioneira na tecnologia de sensores de oxigênio, combinando inovação e experiência para garantir que cada sensor ofereça um desempenho excepcional.
- [TECNOLOGIA INOVADORA] – O Sensor de Oxigênio Bosch é resultado de décadas de pesquisa e desenvolvimento, garantindo um desempenho superior e uma vida útil prolongada.
- [TESTADO DE FÁBRICA] – Cada sensor passa por rigorosos testes de qualidade, assegurando que atenda aos altos padrões de desempenho e confiabilidade da Bosch.
- [CORPO EM AÇO INOXIDÁVEL] – Com um corpo em aço inoxidável soldado a laser, o sensor é totalmente vedado e resistente a danos causados por emissões de escape, aumentando sua durabilidade.
- [AQUECEDOR DE AÇÃO RÁPIDA] – O aquecedor de ação rápida permite que o sensor atinja rapidamente a temperatura de operação ideal, garantindo um desempenho eficiente em qualquer condição.
- [PRONTO PARA INSTALAR] – Com conectores e chicotes OE de ajuste direto, a instalação é simples e rápida, sem necessidade de adaptações complicadas.
- Compatibilidade: Este sensor é compatível com uma ampla gama de modelos BMW, incluindo 320i, 325i, 330i, entre outros, além de veículos Land Rover selecionados.
### Instruções de Uso:
Para instalar o Sensor de Oxigênio BOSCH 13477, siga os passos abaixo:
1. Desconectar a Bateria: Antes de iniciar a instalação, desconecte a bateria do veículo para evitar qualquer curto-circuito.
2. Localizar o Sensor: Identifique a localização do sensor de oxigênio no seu veículo, que geralmente está localizado no coletor de escape ou no tubo de escape.
3. Remover o Sensor Antigo: Utilize uma chave de soquete para remover o sensor de oxigênio antigo. Certifique-se de que a área esteja limpa e livre de detritos.
4. Instalar o Novo Sensor: Aplique um pouco de composto antiaderente nas roscas do novo sensor e instale-o no lugar do sensor antigo, apertando-o com a chave de soquete.
5. Conectar o Sensor: Conecte o chicote elétrico ao novo sensor, garantindo que esteja bem fixo.
6. Reconectar a Bateria: Após a instalação, reconecte a bateria e ligue o veículo para verificar se o sensor está funcionando corretamente.
### Características do Produto
– Tipo de Sensor: Sensor de Oxigênio
– Material: Aço inoxidável com soldagem a laser
– Compatibilidade: Projetado para uma ampla gama de modelos BMW e Land Rover
– Temperatura de Operação: Atinge rapidamente a temperatura ideal para desempenho
– Instalação: Conectores OE de ajuste direto e roscas pré-revestidas
– Durabilidade: Protegido contra danos por emissões de escape
### Perguntas Frequentes (FAQ)
Pergunta: O Sensor de Oxigênio BOSCH 13477 é compatível com meu veículo?
Resposta: Verifique a lista de compatibilidade acima ou utilize o verificador de ajuste para garantir que o sensor se encaixa no seu modelo específico.
Pergunta: Como posso saber se meu sensor de oxigênio está com defeito?
Resposta: Sintomas comuns incluem aumento no consumo de combustível, falhas no motor e luz de verificação do motor acesa. Um diagnóstico adequado pode confirmar a necessidade de substituição.
Pergunta: É difícil instalar o sensor de oxigênio?
Resposta: A instalação é simples e pode ser realizada com ferramentas básicas. Siga as instruções de uso para um processo tranquilo.
Pergunta: O que fazer se o sensor não funcionar após a instalação?
Resposta: Verifique as conexões elétricas e a instalação. Se o problema persistir, consulte um mecânico para uma avaliação mais detalhada.
Pergunta: Qual é a vida útil esperada do Sensor de Oxigênio BOSCH 13477?
Resposta: Com a instalação correta e manutenção adequada, o sensor pode durar vários anos, dependendo das condições de uso do veículo.


Matt K –
Bought my car used with no records so I had no idea when these were changed. My car was not giving me any problems or codes but as preventative maintenance I decided to change them.
It was quite easy but time consuming for me. The reason for this is I was using a Crows Foot (22mm) rather than an O2 sensor socket. If you decided to get an O2 sensor socket, make sure it is thick because if the O2 sensor is stuck on really hard then the socket may bend.
The O2 sensor is located on the passenger side of the vehicle on the exhaust. Nothing needs to be removed to get to them. You can see one close to the positive cable nut (refer to picture) and the other near the secondary air pump, both along the side of the engine.
Remove the wires that go to the O2 sensors from the brackets that are on the engine. Then disconnect one O2 sensor. Remove and install one at a time so you don’t confuse the wires. Use a pick or a similar tool to remove the wires from the O2 sensors.
My O2 sensor was stuck on really hard. I used PB Blaster to loosen the hold on both O2 sensors and let them sit for a day. Next day I went at it and it came off with ease. Only problem with using a Crows Foot is that you have to take it off at each turn. What makes it time consuming is that due to the wire, it will try to twist back into it’s original position. My advice is to twist it with the Crows Foot, hold the O2 sensor with your spare hand and then reposition the Crows Foot on the O2 sensor and turn. Repeat. Keep doing this and it will eventually come off. Or you can just buy a good O2 sensor socket and get it off in less than 10 seconds.
The new O2 sensor already comes with anti seize on the threads so you do not need to buy that. Leave the plastic caps on the thread on until you are ready to install so that you don’t remove the anti seize.
You need to push in while turning to get the sensor to thread in.
Saajan –
Nice to know some parts still fit as advertised.
Juan Carlos Vergara –
My mechanic installed them into a 2001 BMW 530i and the car immediately went into fits. 4 of the 6 cylinders misfired or did not work. The engine was starved of oxygen. The fuel was too rich. It caused so much trouble that I had to replace them with more expensive OEM oxygen sensors. Had I run it longer than a few days, I would have destroyed the engine. I think this is a manufacturing flaw. The Bosch sensors are not designed to do what Bosch claims them to do. I took it to another mechanic who diagnosed the problem and he replaced the new sensors with OEM sensor.
Average Joe –
The secondary air monitor set first cold start after install! Can you hear me smile? These are Bosch and Bosch is the best! Sensors have a protective cap over the threads. Anti seize already on the threads.
Screwed right in and plugged in easily. Great price, great product, great delivery! Get Amazon Prime!
Steven H –
Same quality, cheaper, works as expected. My O2 sensor codes are gone away.
Larry W. Case –
I have a late model BMW 5 series. If it’s Bosch it going in my car. Listen to what I’m writing… I NEVER had any issues with Bosch products Zero!
Matt K –
I own a 2000 BMW 328Ci. The time came to replace the Pre Cat oxygen sensors. These have worked very well. A good decision over the generic brand names at much cheaper cost.
Knuutti J. –
This was a perfect fit. Easy to install with the right tool. After install I drove the car for a few cycles and the check engine light cleared itself. Then went to the SMOG test and passed. This was almost a year and a few thousand miles ago. The sensors still seem to work flawlessly.
DK Gable –
Had a bad o2 sensor on my 2002 BMW 530i (code p0134). Found that the original sensor is Bosch. Purchased this as a replacement and my check engine light hasn’t come back since.
Keith Lindsay –
Great replacement at fraction of cost of OEM part. Works just as good.